Posts

Showing posts from 2020

Knitting Commission

Image
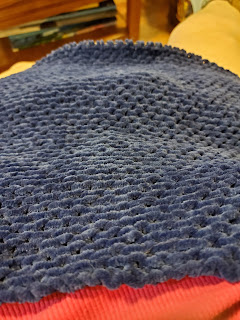
I am notorious for taking forever with knitting anything.  I enjoy knitting but my arms can't do a lot of it before my muscles say no more.  Because of this when I do make something it always goes to someone I love and it is always on my time so when I take 4 bazillion years I don't feel horribly guilty.   Several years ago my sister asked me to design and knit her an afghan of curse words.  She thinks it would be hilarious to be able to say give me the f***ing blanket.  I designed it, sent it to her, she confirmed that was what she wanted and I started working on it.  It's been 4 years of work but in my defense it is a giant blanket that is individual squares that have to be knitted together.  She'll eventual get it.   Now that you have the background I was commissioned to make a shawl for someone.  She wanted something to keep her warm while working from home.  I hesitated to take this on as I hate being rushed through my knitting.  I always end up being off knitting

New epoxy mixing

Image
  I've been experimenting with combining different colors and glitter with my molds to see what I can get out of it.  They've turned out really well for the most part.  This dragon in particular turned out amazing.  I took a little gold glitter and sprinkled it in the mold followed by a burgundy mica and then finally a gray.  Since I only used a little and mixed it up it was able to give the dragon some depth and really enhances the dragon.   Next up was playing around with epoxy boxes. I had purchased from The Glitter Guy the Hallows Pack .  I've used them a couple of times in tumblers and wanted to see how and if they would work in the box molds.  I had a general idea of what colors I wanted for the people who they're for.   Even though they are similar in design they turned out vastly different.  I didn't use as much glitter in this one but more of the HP themed cuts.   When you look inside the box you can see the glitter cuts even better.   This one ended up loo

Life

Image
 Life has been so busy lately.  We adopted a new kitten August 31st.   About two months later we lost my old girl.  It was her time but it sucks.  The new kitten has helped to distract but he isn't her.  With that we also had my little one dealing with being without her big sister for the first time ever.  With this I hadn't been crafting at all.  Gaming yes but all my other interests went to the wayside.  One of the things that came out of our loss was finding out how much shelters and vets office need things.  One of the things I found they needed was new blankets for their kennels.  With how well they were for me and mine I wanted to give back.   This started with a trip to Joann's where I hit the remnants rack for any fleece that was about the size we needed.  I probably got too many but I wanted to help as much as I could.  After washing them my partner in this my mom skip cut around the edge of the fleece.  We then single crocheted around the edge.  I just did single

You can do everything right

Image
 With tumblers I've tried different methods to make awesome cups.  For the most part they turn out awesome and look good and there's no problems.  Every so often there are problems.    This cup I originally hadn't put epoxy on it as it was my first attempt at tumblers.  My sister used it 3 months and the letters started coming off.  She asked if I could fix it.  I got it back and ended up removing all the lettering and starting over.  I then put epoxy over it to help make it last longer.  It turned out awesome but there were some problems getting it done beside the fast turn around.  The tumbler fell off the turner and the epoxy pooled at the bottom.  Put it right back on the turner and hoped for the best.  I had to do a second coat to finish it up but it turned out awesome without having to start all over. Then there is this one.  My cousin requested a tumbler.  Put it on and had no issues with the turning process but this happened. There is a lovely wave of the epoxy on t

I've been neglectful

Image
Life has been so busy.  I've been crafting and canning but also doing so much gaming.  Animal Crossing may be just a little evil.  I had family visit and rushed through some projects to send home and save on shipping.  Sent home with family two new can cozies.  They turned out amazing and I was thrilled that I was able to get them done in such a short time.    There was also an order made by one of my favorite authors.  I had sent her a gorgeous cup posted about it on July 1st and she wanted one for a friend but in different colors.  The colors she wanted were gold, green, and black.  I think it turned out awesome. Now that canning and dehydrating is wrapping up for the seasons I should have a little bit more time to craft and blog so expect some more posts coming in the coming weeks.

Book Themed Crafts

Image
My living room is full of books.  I've now branched out in decorating the room with book themed crafts.  It was a happy accident.  Some of them are super easy.  While others took a little bit more time and supplies. First up is letters.  I bought these paper mache  letters for BOOKS (the s is missing right now).  All I had to do with these letters was paint them.  I painted all of the letters with black craft paint.  Once it dried I took color changing  top coat paint and did a final coat over the black.  Once it had dried and I got all the spots I missed the project was done and I just had to find a home for it. I love how these turned out and they look amazing ontop if my books. I might have to come up with some other words to do in the different shimmer paint.

Book Organization

Image
I've told you how I made my book shelves now lets talk about organization.  Like I said in the last post I am a librarian.  I have a book scanner to scan my books into a catalog to track my books.  The catalog is organized so that I don't accidentally buy two copies of the same book.  Let's just say I am a bit obsessed with my books.  There is no way my books are organized by color or size.  Ok mine are sorta by size but for a reason. One of the problems I was running into was when I would go to put away the new books it would take time to figure out where the new ones would go.  Books would get shelved out of order because there was just one small book with that authors in Q and I missed it. I looked at different options.  I saw something that clicked in my brain to make tabs for each letter/number to separate my books.   I picked up letters and numbers  similar to these and jumbo wood tabs  like this.  I painted the jumbo tabs with black craft paint.  I wanted them to be

Book Storage

Image
Not all of my craft projects are small. In my professional life I am a librarian.  I love all things books.  Book theme everything.  I have a massive book collection between audio, digital, and physical books.  Books are what I buy besides my crafting supplies.  Book cases are expensive particularly when you need 8 not standard size ones.  Yes that is just for me. My living space has been taken over by book cases and I am good with that.   This is just one of them.  It fits my hardcover and trade paperback books.   Here it is full of books.  I have a second bookcase that is also the same dimensions.  I just took 1 x 8 x 6 boards painted them the color I wanted.  To prevent paint transfer to my pretty books I also use polyurethane to seal in the paint.  I went with a less shiny polyurethane because I'm not a fan of shiny but if you are interested in it go for it.  Once they were all dried I took 2 inch screws and screwed in the boards.  The 2 inch screws to help support the books. 

Projects

Image
This last week as been very busy.  We're coming up to the holiday and it is now the growing season in the Midwest which means canning.  Farmer's market on Saturday to get a whole host of fresh goodies to consume.  Later in the season I'll share some of them plus the fun can have labeling all of the goodies. I had participated in an event for an author and made two tumblers with one more to go.  The people wanted two very different Tumblers but with a quotes from the books.  Both turned out amazing and hope they like them. I am also experimenting with tattoo paper to make a tumbler.  Now to cut them out and get them on the tumbler.  Fingers crossed it will turn out ok.   I've been playing with more molds.  Here's my newest one.  I'm not sure about how it turned out.  Let me know what you think.

Pros and Cons of Fabric Tumblers

Image
With every craft there are pros and cons with the project.  I really enjoy playing around with new methods of spicing up tumblers.  Glitter and paint is fun but it doesn't give you a consistent finished project.  I can start with it in straight lines and by the time the epoxy has hardened it has mixed and mingled into something completely different.  Check out my Instagram  page for beginning and ending shots. Pros: You can pick whatever you like in color and get an interesting tumbler.  There is no way that I could make this tumbler with glitter, paint, and vinyl.   Even with layering I wouldn't be able to get these colors and patterns.  If there is an obscure design or fandom you like and can find fabric for it you can make yourself a tumbler that won't necessarily cost you $45.  You can still add vinyl to the project if you want something a little more than just the fabric.  Cons: You have to use a straight tumbler that has no curve to it at all.  It isn't always eas

Guest Post: Creating your own Patterns by Eileen Troemel

A Bag of Yarn “Mom will you make me….”  Over the years, my daughters, nieces and occasionally my nephews ask me to make them something.  Often this is accompanied by a picture or a pattern.  There were times I spent money on patterns only to buy yarn and follow the pattern to discover it was not well written. This has happened to me so many times.  I hate wasting money on patterns only to discover they aren’t well written or tested.   I started crocheting when I was twelve.  I was an infrequent crocheter until my late teens.  More than once I’ve made enough afghans for my nieces and nephews for Christmas.  I love to take yarn – fiber of some sort – and turn it from a long strand to something I know someone will use.              During one visit with my daughter, she showed me a pattern for a trivet.  She asked and wanted.  I was okay – I’ll try.  I was so frustrated.  It looked simple.  It should have been simple.  But it wasn’t.  I asked her if she had to have that specific pattern. 

Supplies Needed for a Tumbler

People might hesitate to start making their own tumblers because they're afraid of all the upfront costs/supplies needed.  You can get away with going with less and still get an amazing tumbler.  Here's a list of all the items you absolutely have to have.  At the bottom will be a list of all the things you can get but don't necessarily need. Tumbler of some kind.  You can go with a cheap one from Wal-mart like this  one  or  this .  Or you can order a bunch from different sources on-line and get a bulk pricing. Epoxy.  There are tons of kinds available.  My preferred one is  Clear Casting and Coating Epoxy Resin  as it doesn't have a strong odor to it.  I tried a different company that came highly recommended but it gave me a headache so I'm sticking with this one.  Glitter. You can literally get glitter anywhere even the dollar store.  Glitter is glitter and any will work Glue of some kind.  Read my last post about the different methods of adhering glitter to the c

Different Methods to Glitter a Tumbler

Image
There are several ways to get the glitter on your cup.  Depending on who you talk to they will swear by one method or another.  I've tried all of these methods and have had success with them all.  However, some have more work involved then others which ultimately makes me prefer two over all of them. Mod Podge: This is the first one I tried when I started learning about tumblers.   With this method you take a paintbrush and lightly coat the cup with mod podge.  Once it is evenly coated you glitter your cup.  Then you wait.  The cup has to be completely dry before you do a second coat and it takes several hours for it to dry.  The glitter didn't completely adhere to the cup so a lot of glitter fell off as it dried.   Here is my first attempt at epoxy tumblers.  The one on the left is the very first one and the glitter smeared a little bit too much for me.  I learned later if I had used something like this  Minwax Spray  or  Krylon Spray  it would have prevented the glitter from